Note: Our site links to archery and bowhunting products sold by outside vendors, and we may earn a small commission if you purchase an item after clicking one of these links. Learn more about our affiliate program.
Getting started in archery is tough. There are dozens of terms and tools, and it can be difficult to piece everything together. Even a simple bow, like a recurve, can be a bit puzzling.
So, to help you get started, here’s a quick rundown of the most important parts of a recurve bow, how they each work, and why they’re important. We’ll start broad and get into more detail as we go along, and once you’re ready, you can take a look at the recurve bows we recommend.
Here’s the first thing you need to know:
A Recurve Has Three Main Parts
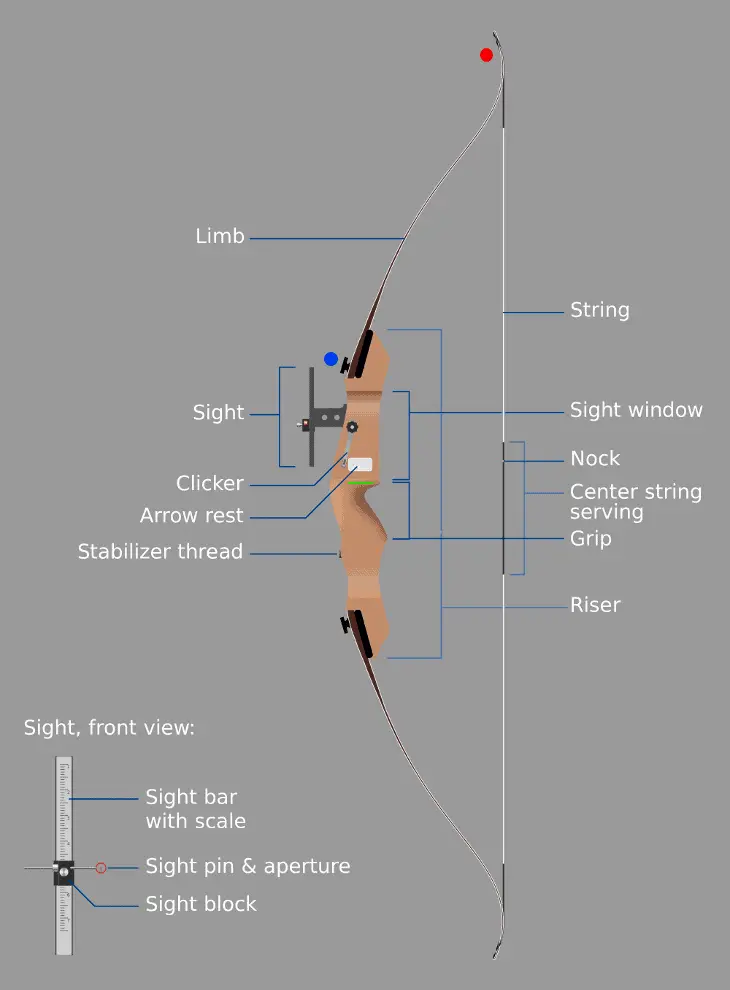
And those three parts are a riser, two limbs, and a bow string. You can find them in the following chart:

If you take a close look at each of those three parts—the riser, the limbs, and the bow string—they feature other, smaller parts. We’ll get into all that, and we’ll begin by describing the “busiest” part of the bow, which is…
The Bow’s Riser
This is where you grasp the bow. While it looks like a simple thing, there’s actually a lot going on. In the image above, you’ll see that the riser includes:
> The handle, which is molded to fit the archer’s hand. Recurve bows are specifically made for right-handed and left-handed people, so you’ll need to decide which kind of bow you want to get. There are certain types of traditional bows that could be help in either hand, but modern recurve bows are made specifically for righties or lefties.
> A platform, called a “shelf.” The shelf is the where you can put your arrows on when you draw (and shooting arrows off this platform is usually called “shooting off the shelf”). We added a green line to the diagram above to show where it is—the shelf is riiiiiiiight above that small green line.
> An elevated rest, right above the shelf. Many recurve archers—particularly target archers and competitive archers—attach an elevated rest to their bows, and shoot arrows off of that, instead of shooting off the shelf. Most people believe (we do, too) that shooting off an elevated rest improves accuracy. Many bows come with an elevated rest that you can attach to your riser.
> A place to attach a bow sight. Many archers use a bow sight, because it makes target archery and hunting much, much easier, but there are plenty of archers who forego a bow sight, and shoot “instinctive.” Most recurve bows come with a place to attach a bow sight (although many “traditional” recurve bows do not).
> A clicker. This is something new archers don’t need to worry about; it’s allows competitive archers to draw their arrows to a very precise draw length. Archers place an arrow underneath the clicker, and then when the arrow is pulled back past the clicker, the clicker smacks the bow, makes a hard “click” sound (hence the name!), and tells the archer that he/she has reached an ideal draw length. Again, it’s kind of an advanced concept, so if you’re new to archery, you probably don’t need to worry about it.
> A place to attach a stabilizer. This is another piece of equipment for competitive archers. After you’ve been shooting for a while, you’ll find that your bow shakes a little bit when you hold it; a stabilizer allows you to hold the bow with a steadier hand. It’s another thing you don’t need to worry about when you’re new to archery, but it’s a good feature to have, so that when you’re ready to up your game, you can purchase a stabilizer and attach it to your riser.
Attached to the recurve riser are…
The Limbs of the Bow
These are part of what makes a bow a bow, and the limbs above are unique to recurve bows. If you look at the tippy-top of the upper limb and the absolute bottom of the lower limb, you’ll see that they bend forward a little bit (we’ve added a red dot at the top limb to show you where we’re talking about). That’s where we get the term “recurve”—the limbs curve back towards the archer, and then curve away from the archer at the end of each limb.
The reason why recurve bow limbs are an advantage is because they allow the archer to more fully draw the bow string, so that when he/she releases the bow, the limbs move forward more quickly, and transfer more energy to the arrow. Those graceful curves on the top and bottom limbs beeeend back, and pulllllll the bow limbs forward, and that results in more speed for the arrow. Old-school bows—usually called long bows—don’t have that “recurve” feature; the limbs on a long bow curve back towards the archer, and stop there.
Takedown Limbs. You’re going to see the term “takedown” a lot when you’re learning about recurve bows. Takedown limbs are limbs that you can remove from the riser. This is a really, really fantastic aspect of recurve bows, because you can buy a bow with 20-pounds limbs, and then, after you’ve practiced for a while and built the appropriate “archery muscles” in your arms and torso and back, you can unscrew the limbs you have, replace the 20-pound limbs with 25-pound limbs, and now you’ve got a bow that shoots arrows faster and with more force. You can do this again and again, until you’re using very heavy limbs, and your draw weight is in the 50s or 60s—and on some bows, even higher than that. (By the way, if you look at the diagram above, we’ve added a little blue dot where you would remove the upper limb).
So, a “takedown bow” refers to a recurve bow with limbs that you can remove, and that’s an awesome feature because it means you can buy one bow and have it for years. Long bows and traditional bows are often made from one piece of wood, so you can’t remove the limbs, and that means whatever the draw weight on that bow is, that’s the weight it’s going to stay. That can be a fine option if you’ve worked your way up to a personal draw weight you like, but if you’re not there yet, it makes takedown bows a great idea.
We almost always recommend that new archers interested in recurve bows—and especially children and teens—get a takedown recurve. Because their ability and strength changes over time, it’s an advantage to have a bow that can be adjusted for those changes.
Finally, attaching the top limb to the bottom limb is the…
The Bow String
Bow strings have come a loooooong way in the last few decades. The part of the string that you grasp with your draw hand is called the “center string serving”—see the diagram above—and the part of the center string serving where you attach your arrow is called the “nock.” A nock is a little metal thing you attach to the string, but you can also make your own nock using thread. The nock needs to be placed at a specific location, and most bow manufacturers give you specific instructions on where you should place the nock.
By the way, many bows come with a bow string, and that’s a nice feature—it’s one less thing you need to think about, if you’re new to archery and purchasing your first bow.
There You Have It
Recurve bows are great for beginners, because they’re relatively simple (even though they may not seem that way to you right now!). Compound bows and crossbows get a lot more complicated.
We hope that helps! If you’ve got any more questions, jump over to our archery for beginners post, and you can get a broad overview of what you need to know to start in your archery adventure.
Good luck, have fun, and all the best to you!


